

Satellite television has changed considerably over the years, with broadcasters constantly improving their networks and expanding the range of services available to viewers.
These developments can also bring technical changes that affect the way individual channels are received. A new frequency or updated transmission parameter may require viewers to refresh the information saved on their receivers.
For users who are unfamiliar with manual tuning, this process may initially seem complicated. In reality, most modern receivers provide straightforward installation menus that allow channels to be searched for using their relevant reception information.
This article is intended to make that process easier by presenting the channel information in an organized and accessible way. It also explains the general procedure for carrying out a manual search and adding the channel to the receiver\\\\\\\’s list.
Keeping your channel database updated can help you avoid unnecessary searches and quickly restore access whenever broadcasting settings change. With the right information and a properly configured satellite system, finding the desired channel becomes a much simpler task.
The Astra 23.5°E satellite position is an important European orbital location that carries a variety of tv, radio and data services. For viewers in the United Kingdom, receiving Astra 23.5°E requires accurate dish positioning, a sharp line of sight and correctly adjusted satellite equipment.
Although finding the satellite is not difficult, even a small error in the dish direction, elevation angle or LNB position can significantly affect transmission clarity. This step-by-step guide explains how to align a satellite dish to Astra 23.5°E in the UK and achieve the strongest possible transmission.
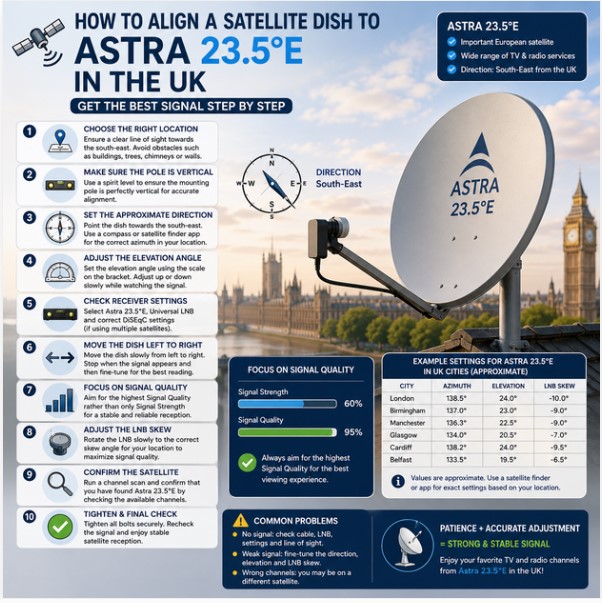
Step 1: Choose the Right Location for Your Satellite Dish
The first step is selecting a suitable location for the dish.
Your satellite dish needs a completely sharp line of sight toward the south-east. Because Astra 23.5°E is located at an orbital position east of the United Kingdom, the dish must be directed toward the appropriate south-eastern section of the sky.
Before installing the dish, check for possible obstacles such as:
- Tall buildings.
- Trees and branches.
- Chimneys.
- Walls.
- Nearby houses.
- Roof structures.
- Large metal objects.
Even if the dish has a sharp view when installed, remember that trees can grow and eventually block the transmission.
Step 2: Make Sure the Mounting Pole Is Perfectly Vertical
Before adjusting the satellite dish, check that the mounting pole or wall bracket is completely vertical.
This is one of the most important steps in the configuration process.
Use a spirit level to check the pole from different sides. If the mounting pole is tilted, the elevation scale on the dish bracket may not provide accurate results.
A perfectly vertical pole makes it much easier to:
- Set the correct elevation.
- Adjust the dish accurately.
- Find the satellite more quickly.
- Maintain a steady transmission.
Step 3: Set the Approximate Astra 23.5°E Direction
The next step is to position the dish in the approximate direction of Astra 23.5°E.
From the United Kingdom, the satellite is generally located toward the south-east.
However, the exact azimuth angle changes depending on your location.
The direction required in:
- London.
- Birmingham.
- Manchester.
- Liverpool.
- Cardiff.
- Glasgow.
- Edinburgh.
- Belfast.
will not be exactly the same.
For this reason, it is recommended to use a satellite positioning calculator, satellite finder application or professional transmission meter to determine the correct azimuth for your exact location.
Set the dish approximately in the correct direction before starting the fine positioning process.
Step 4: Adjust the Dish Elevation
The elevation angle determines how high the satellite dish should point above the horizon.
The correct elevation for Astra 23.5°E changes depending on where you are located in the UK.
As a general rule, the satellite appears lower in the sky as you move farther north, which means viewers in northern areas may require different elevation settings compared with viewers in southern England.
To adjust the elevation:
- Loosen the elevation bolts slightly.
- Use the elevation scale on the dish bracket as a starting point.
- Set the approximate angle for your location.
- Move the dish slowly upward or downward.
- Watch the transmission clarity reading on your device.
Make very small adjustments and wait for the device to update the transmission meter.
Step 5: Use the Correct Receiver Settings
Before searching for the satellite transmission, make sure the device settings are correctly configured.
The basic settings may include:
- Satellite: Astra 23.5°E
- LNB Type: Universal
- LNB Frequency: According to the LNB specifications.
- DiSEqC: Set correctly if you are using multiple LNBs.
If you are using a multi-satellite system, make sure Astra 23.5°E is assigned to the correct DiSEqC port.
Incorrect device settings can make it difficult to find the satellite even when the dish is pointing in the correct direction.
Step 6: Move the Dish Slowly from Left to Right
After setting the approximate direction and elevation, begin searching for the satellite.
Move the dish very slowly from left to right.
Do not make large or fast movements.
A good method is to:
- Move the dish a very small distance.
- Wait several seconds.
- Check the transmission clarity.
- Continue moving slowly.
- Stop when the transmission begins to appear.
Satellite receivers may take time to update the transmission meter, so moving too quickly can cause you to pass the correct satellite position.
Once a transmission is detected, continue making smaller adjustments until the highest possible clarity is reached.
Step 7: Focus on Signal Quality
Most satellite receivers display both:
- Signal Strength
- Signal Quality
Signal strength is useful, but it is not enough to confirm that you have found the correct satellite.
A strong transmission can sometimes come from a nearby satellite position.
For accurate positioning, focus primarily on Signal Quality.
The goal is to find the dish position that provides the highest steady clarity reading.
Once you have found the best transmission:
- Make small horizontal adjustments.
- Make small elevation adjustments.
- Check whether transmission clarity improves.
- Stop when further movement reduces the transmission.
This process is known as fine-adjustment the satellite dish.
Step 8: Adjust the LNB Skew
The LNB skew is the rotation angle of the LNB inside its holder.
The correct LNB skew varies according to your location in the UK.
After finding the Astra 23.5°E transmission, slowly rotate the LNB while monitoring transmission clarity.
Follow these steps:
- Loosen the LNB holder slightly.
- Rotate the LNB in very small movements.
- Monitor the transmission clarity.
- Find the position that gives the best result.
- Tighten the LNB securely.
Even a small adjustment to the LNB can improve reception clarity.
Step 9: Confirm That You Have Found Astra 23.5°E
After receiving a strong transmission, do not immediately tighten the dish completely.
First, confirm that you have actually found Astra 23.5°E.
You can do this by:
- Performing a channel search.
- Checking the detected services.
- Verifying the satellite name shown by your device.
- Checking known active services or transponders available from the orbital position.
This step is important because several satellite positions are relatively close to Astra 23.5°E.
Finding a strong transmission does not always mean that the dish is pointing at the correct satellite.
Step 10: Tighten the Dish and Perform a Final Signal Check
Once you are satisfied with the transmission clarity, carefully tighten all dish mounting bolts.
Do this gradually.
Tightening one bolt too quickly can slightly move the dish and reduce the transmission.
After tightening each bolt, check the transmission clarity again.
When all bolts are secure:
- Check the transmission clarity.
- Confirm that the transmission remains steady.
- Check the LNB connection.
- Perform a channel search.
- Test several services to confirm reliable reception.
Common Problems When Aligning Astra 23.5°E
No Signal Appears
If no transmission appears, check the following:
- Make sure the dish is pointing in the correct general direction.
- Recheck the elevation angle.
- Confirm that the mounting pole is vertical.
- Inspect the satellite cable.
- Check the LNB connection.
- Make sure the device settings are correct.
- Confirm that there are no obstacles blocking the dish.
A Strong Signal Appears but the Wrong Channels Are Found
This usually means the dish is pointing at another nearby satellite.
Continue making very small adjustments and verify the satellite using your device or a known active service.
Signal Quality Is Low
Low transmission clarity may be caused by:
- Slightly incorrect dish direction.
- Incorrect elevation.
- Incorrect LNB skew.
- Poor-clarity cable.
- A damaged LNB.
- Loose connectors.
- Obstructions in the transmission path.
Fine-adjustment the dish can often improve the transmission significantly.
Can Astra 23.5°E Be Received with Another Satellite on the Same Dish?
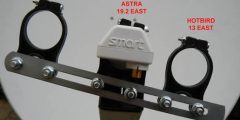
Yes, depending on the dish size and configuration setup, it may be possible to receive Astra 23.5°E together with other nearby satellite positions using multiple LNBs.
One popular option is combining nearby European orbital positions in a multi-LNB configuration.
However, the exact setup depends on:
- The size of the satellite dish.
- Your location in the UK.
- The satellites you want to receive.
- The type of LNB holder.
- The DiSEqC configuration.
- The available transmission strength at your location.
For the best results, align the main satellite accurately before adding additional LNBs.
Tips for Getting the Strongest Astra 23.5°E Signal
To achieve the best possible reception, follow these tips:
- Install the dish where it has a sharp line of sight.
- Make sure the mounting pole is perfectly vertical.
- Use a good-clarity LNB.
- Use high-clarity satellite cable.
- Protect outdoor cable connections from water.
- Avoid unnecessary cable joins.
- Move the dish slowly during positioning.
- Focus on transmission clarity.
- Adjust the LNB skew carefully.
- Check the transmission again after tightening the bolts.
Can Weather Affect Astra 23.5°E Reception?
Heavy rain, snow, strong winds and poor weather conditions can affect satellite reception.
A properly aligned dish with a strong transmission margin is more likely to maintain steady reception during difficult weather.
This is why accurate dish positioning is important.
If the dish is only just receiving a weak transmission, rain or heavy cloud may cause the picture to break up or disappear completely.
Fine-adjustment the dish to achieve the highest possible transmission clarity can improve reception reliability.
How to Improve Reception of Encrypted Satellite Channels
- Start by ensuring that the dish is accurately aligned with the required satellite.
- Use a suitable LNB, high-quality cabling, and a receiver that supports the channel\’s transmission standard.
- Check signal quality on the specific transponders carrying the encrypted services.
- For authorized services, keep the receiver software and subscription-related settings properly updated.